Welcome to your beginner’s guide to the Instant Pot. If you can use a smartphone, you can easily use an Instant Pot—and the results are nothing short of amazing. Chili that once took all afternoon to cook is now ready in just an hour with your Instant Pot. Frozen chicken can go from the freezer to the dinner table in under 30 minutes. If you’re trying out the Instant Pot for the first time, this guide has everything you need to build confidence and inspire creativity in your kitchen.
What is an Instant Pot?
The Instant Pot, in short, is a convenient multi-cooker that resembles a pressure cooker and slow cooker wrapped in one appliance. Depending on the model, it can do the job of a rice cooker, yogurt maker, slow cooker, pressure cooker, and even a traditional sauté pan.
Overview of Instant Pot Functions
Though every Instant Pot has the same basic multi-cooking functionality, some are more versatile than others. Popular models include the Duo, Pro, Ultra, and Max and vary in advanced features and customizations. Instant Pots come in 3 sizes to suit different needs: 3-quart is great for small households or side dishes, 6-quart (or sometimes 6.5-quart depending on model) is the most popular size and great for families, and the 8-quart size is ideal for larger families or those who prefer to batch cook. It’s important to note that even the basic models can save you time and make cooking easy and enjoyable as they take the guesswork out of figuring out the heat and pressure your food needs. All Instant Pot models can pressure cook and slow cook but some offer more robust features. Let’s break down the basic functions:
Pressure cooker – This is the Instant Pot’s most popular feature. It cooks food quickly by using high-pressure steam and is perfect for roasts, stews, and beans. It’s like your grandma’s pressure cooker, but much easier and more convenient. Slow cooker – This function allows you to cook meals slowly over several hours, much like a a traditional slow cooker. It’s excellent for cooking tender roasts and hearty stews. Rice cooker – Most models have a designated button for rice because the Instant Pot can cook rice to fluffy perfection every time. Whether you’re cooking white rice, brown rice, or even ancient grains like quinoa and bulgur – it’s perfect every time! Steamer – All you need is a steamer basket to hold the food and a little water on the bottom to create steam. Sauté – This is my favorite function on my Instant Pot because it gives you incredible flavor. Whether you’re making chili or beef stew, you want to brown meats, onions, or spices to really bring out the flavor, and the Instant Pot conveniently lets you do it in the same pot, which means fewer dishes to clean up. Yogurt maker – Some models include a yogurt function that helps control the temperature of the milk so your yogurt has the right texture and flavor. Warmer – This function keeps your food warm until you’re ready to serve it, which is great when your meal is done before everyone is ready to eat.
Understanding the Different Buttons
Let’s take a look at the common buttons and settings that come with your Instant Pot:
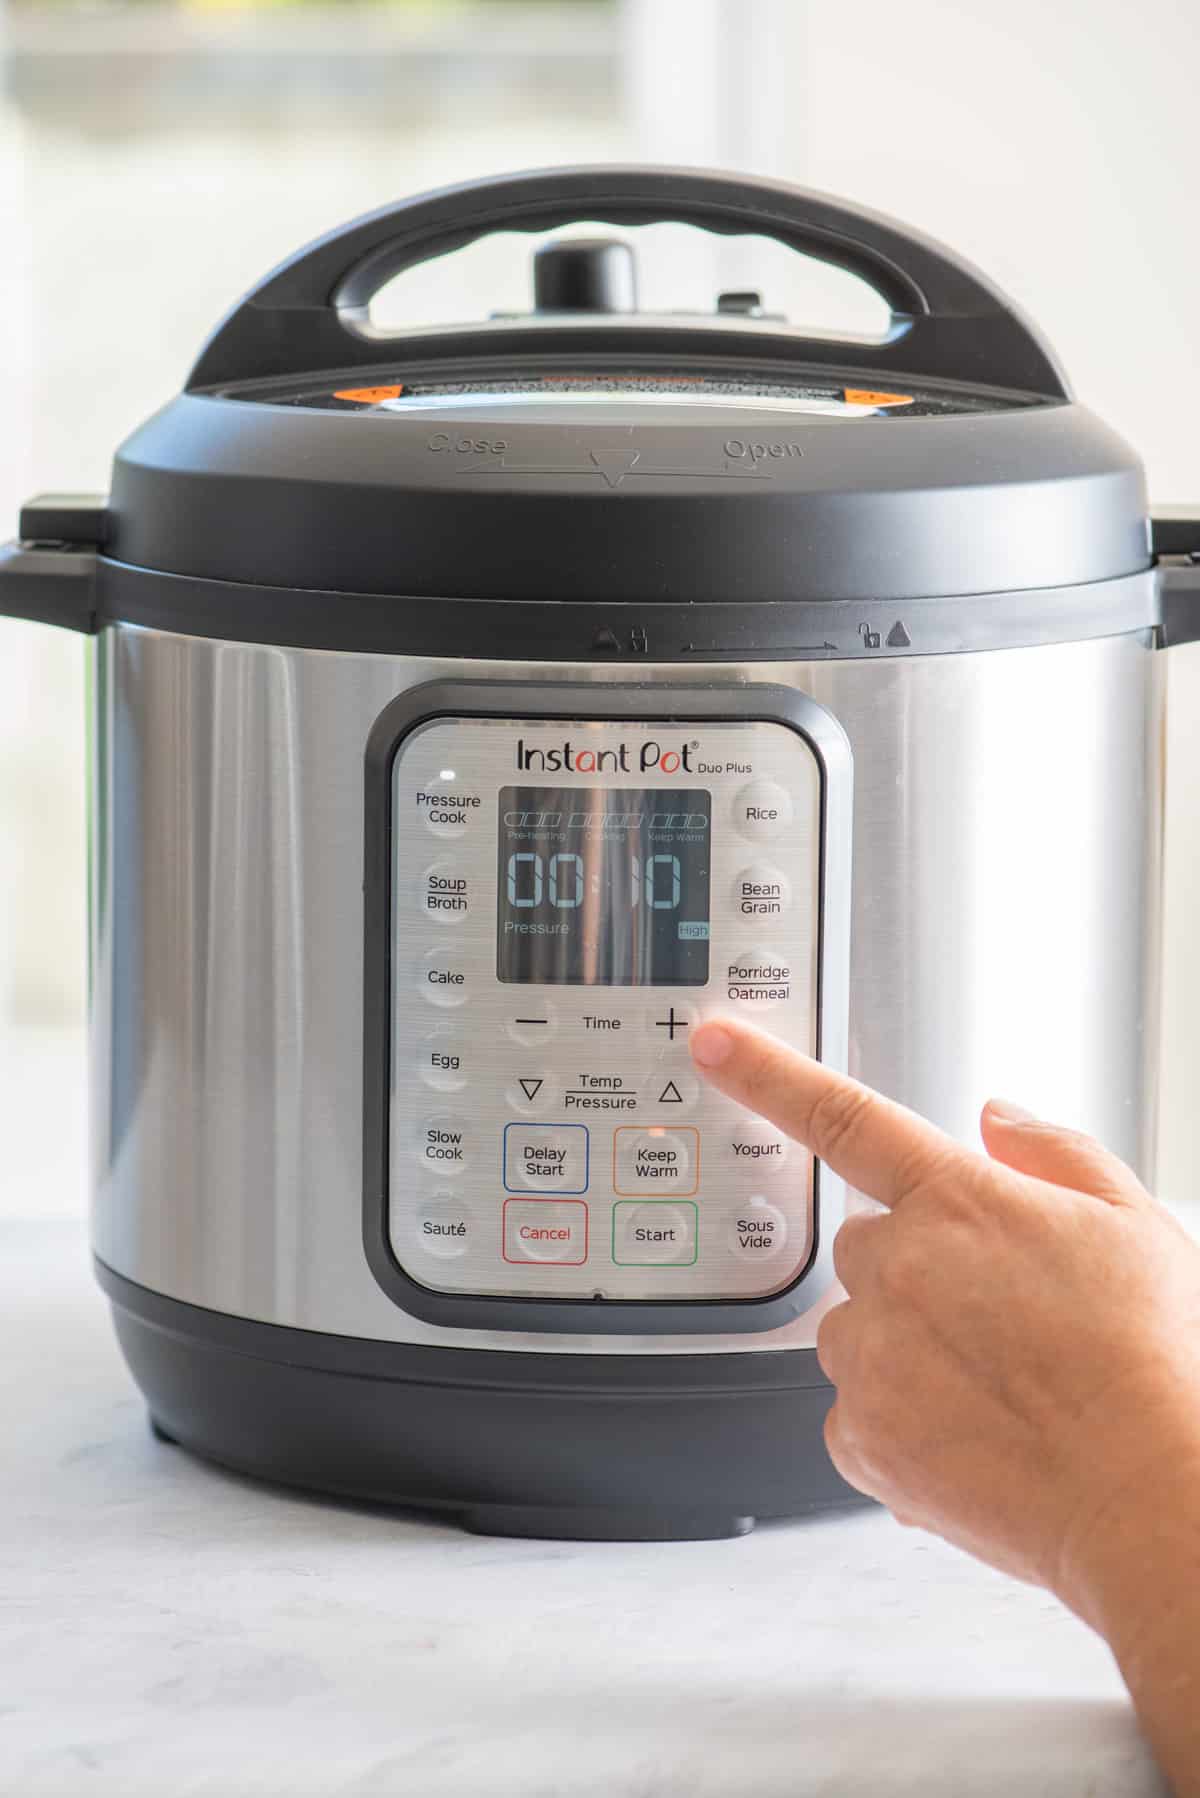
Pressure Cook or Manual on older models: This is the primary cooking method that uses high pressure to cook food quickly. This function lets you change the cooking time by pressing + or – to add or subtract time. You can also toggle between low and high pressure by pressing the Pressure Level button. (Note: Not all models have the pressure setting) Quick tip: For tougher cuts of meat, a longer cook time on high pressure is ideal, while delicate foods like fish may require shorter times and lower pressure. Slow Cook: This function works just like a traditional slow cooker, cooking food over an extended time at lower heat. It’s great for recipes that benefit from low and slow cooking, like roasts or chili. And similar to the Pressure Cook function, you can press the + or – to adjust the cooking time. Quick tip: Use an Instant Pot glass lid for easy monitoring. It has a vent that allows the steam to escape and helps prevent condensation. Sauté: If you want to add flavor to your Instant Pot meals, master this function. It works the same way as a pan on the stovetop. The sauté button allows you to brown meats or saute vegetables like mirepoix to help lock in flavors and add depth to your dishes. And it does so by heating the bottom of the pot. When you first press the Sauté button, the time will default to 30 minutes, but you can turn it off by pressing the Cancel button. You can also use this function to reheat your food. Quick tip: Remember to deglaze the bottom of the pot with a little liquid like vegetable broth, chicken stock, or water. This helps avoid the Burn notice and adds even more depth to your dish because those stuck-on bits, also called fond, are packed with flavor. Keep Warm: This means just what you think it means – it will maintain a safe temperature after your food is done cooking. After the cooking cycle, the Instant Pot automatically switches to Keep Warm setting. Press this button if you don’t want it to default to that setting after cooking. Quick tip: Be careful about keeping certain foods, like rice, warm for too long as it may dry out. Unless you’re home and able to turn it off, use this function sparingly. You can also press Cancel to stop any ongoing cooking cycle. Delay Start: The delay cooking mode allows you to set a future time for your cooking to begin. To use this function, press the manual or Pressure Cook mode first, then press the Delay Start button and adjust the time by using the + and – buttons. The digital display screen will show the time until the desired cooking time begins, at which point the Instant Pot will switch to ON and begin the cooking cycle. Quick tip: Avoid using this for recipes that have perishable ingredients as leaving food out too long may pose a food safety risk. Foods like beans, potatoes, and grains are great for this mode of cooking. When using this function, it’s important to remember to factor in the time it takes to build up pressure and release pressure after cooking is done. Programmed Buttons: Depending on the model, programmed options include Soup/Broth, Meat/Stew, Bean/Chili, Poultry, Rice, Multigrain, Porridge, Yogurt, Cake, and Steam. The newer models may have even more options. These functions have pre-set cook times that automatically adjust the time and pressure based on the food and liquid in the pot. Honestly, I prefer to stick to manual mode so I can better control the cook time and pressure level. Quick tip: If you would like to master these pre-set programmed buttons, I recommend to consult the manufacturer’s Users Manual, as all models vary with their customized functions.
Instant Pot Accessories
Your Instant Pot will come with everything you need to make a delicious recipe. However, the cult-like following of the Instant Pot has prompted the manufacturers to make accessories that make Instant Pot cooking more enjoyable and super convenient. Here are my favorite Instant Pot accessories that you may find helpful in your kitchen.
Tempered Glass Lid – This is helpful when using the slow cooker option for recipes like hot chocolate. Or when you want a slimmer lid to store the whole inner pot with leftovers in the fridge. Mesh Steamer Basket – I prefer this over the trivet to hold my eggs when cooking hard-boiled eggs, but the options are endless. Steam your veggies, fish, and chicken using this steamer basket, then carefully lift it by the handle to remove it from the heat so it doesn’t overcook. Silicone Cover – Similar to the glass lid, it makes it easy to cover your food without dirtying another container. Then, pull it from the fridge and reheat the food in the Instant Pot. Stainless Steel Inner Pot – I have two of these that I use regularly and on rotation. If one is occupied or going through a deep clean, I use another one. Silicone Sealing Rings – It’s always a good idea to have a few extra sets of these, especially if they get regular wear and tear. Silicone Egg Bites Molds – Silicone accessories are great for Instant Pot, and these molds are perfect for my egg white bites. Instant Pot Air Fryer Lid – Turn your pressure cooker into an air fryer just by swapping out the lid. This is the official Instant Pot detachable lid that fits most 6-quart models.
Setting Up Your Instant Pot for the First Time
Unboxing and Initial Setup
Performing a Water Test
Don’t be tempted to skip the Instant Pot water test, especially if you’re learning how to use an Instant Pot for the first time. This is such an easy way for you to get a little more comfortable with this kitchen appliance. It also checks to make sure your Instant Pot runs as it should. Here’s how to do the water test: That is it – you’ve passed the water test! At this time, carefully dump the water, rinse out the inner pot, and let everything air dry well.
How to Use the Instant Pot for Basic Cooking
Once you’ve done the water test, the fun part begins – cooking all the tasty dishes. But don’t get ahead of yourself. Start with something simple and work your way up so you’re comfortable cooking up a storm. Let’s start with Instant Pot hard-boiled eggs. If you are nervous about how to use an Instant Pot for the first time, this recipe is for you. I have a very thorough, detailed tutorial on that if you want all the details, but this is a very basic recipe you can’t mess up.
Cooking Your First Recipe
If you’re looking for how-to’s of Instant Pot for beginners, eggs are a great start. It’s incredibly easy if you remember the 4-4-4 rule. What that means is you cook them for 4 minutes on high pressure, 4 minutes of natural pressure release, and 4 minutes of ice bath.
Step 1. Pour ½ cup of water into a 6-quart Instant Pot, add the steam rack, and gently lower the eggs on the rack spread out in a single layer. Step 2. Place the lid on and move the steam release valve to the Sealing position. Press Manual and set the timer to 4 minutes on high pressure. You’ll notice the Instant Pot will begin building up pressure and may make hissing sounds as it reaches the correct pressure. This can take 8-10 minutes. As soon as it pressurizes, the timer will begin counting down. Step 3. After the cooking cycle, let the Instant Pot do a natural pressure release for 4 minutes. The display screen will say “L 0:04.” Then, do a quick pressure release by turning the steam release valve to the Venting position to release any remaining pressure. Carefully open and remove the lid. Step 4. Remove the eggs from the Instant Pot and place them in an ice water bath for 4 minutes. Discard the water. Step 5. Remove the eggs from the water bath and store in the fridge.
Understanding Pressure Cooking Stages
If you followed the instructions for cooking the hard-boiled eggs, you would’ve noticed that there are three main cooking phases with this appliance, and I’ll go over them in this Instant Pot guide. After you add all the ingredients and liquids into the inner pot, secure the lid, and choose your settings, you will notice how the Instant Pot moves through the following 3 stages: Note: It’s important to mention that the active cooking time does not include the time it takes for the Instant Pot to come to pressure or the time needed to release pressure afterward. This is important and should factor in extra time when planning meals.
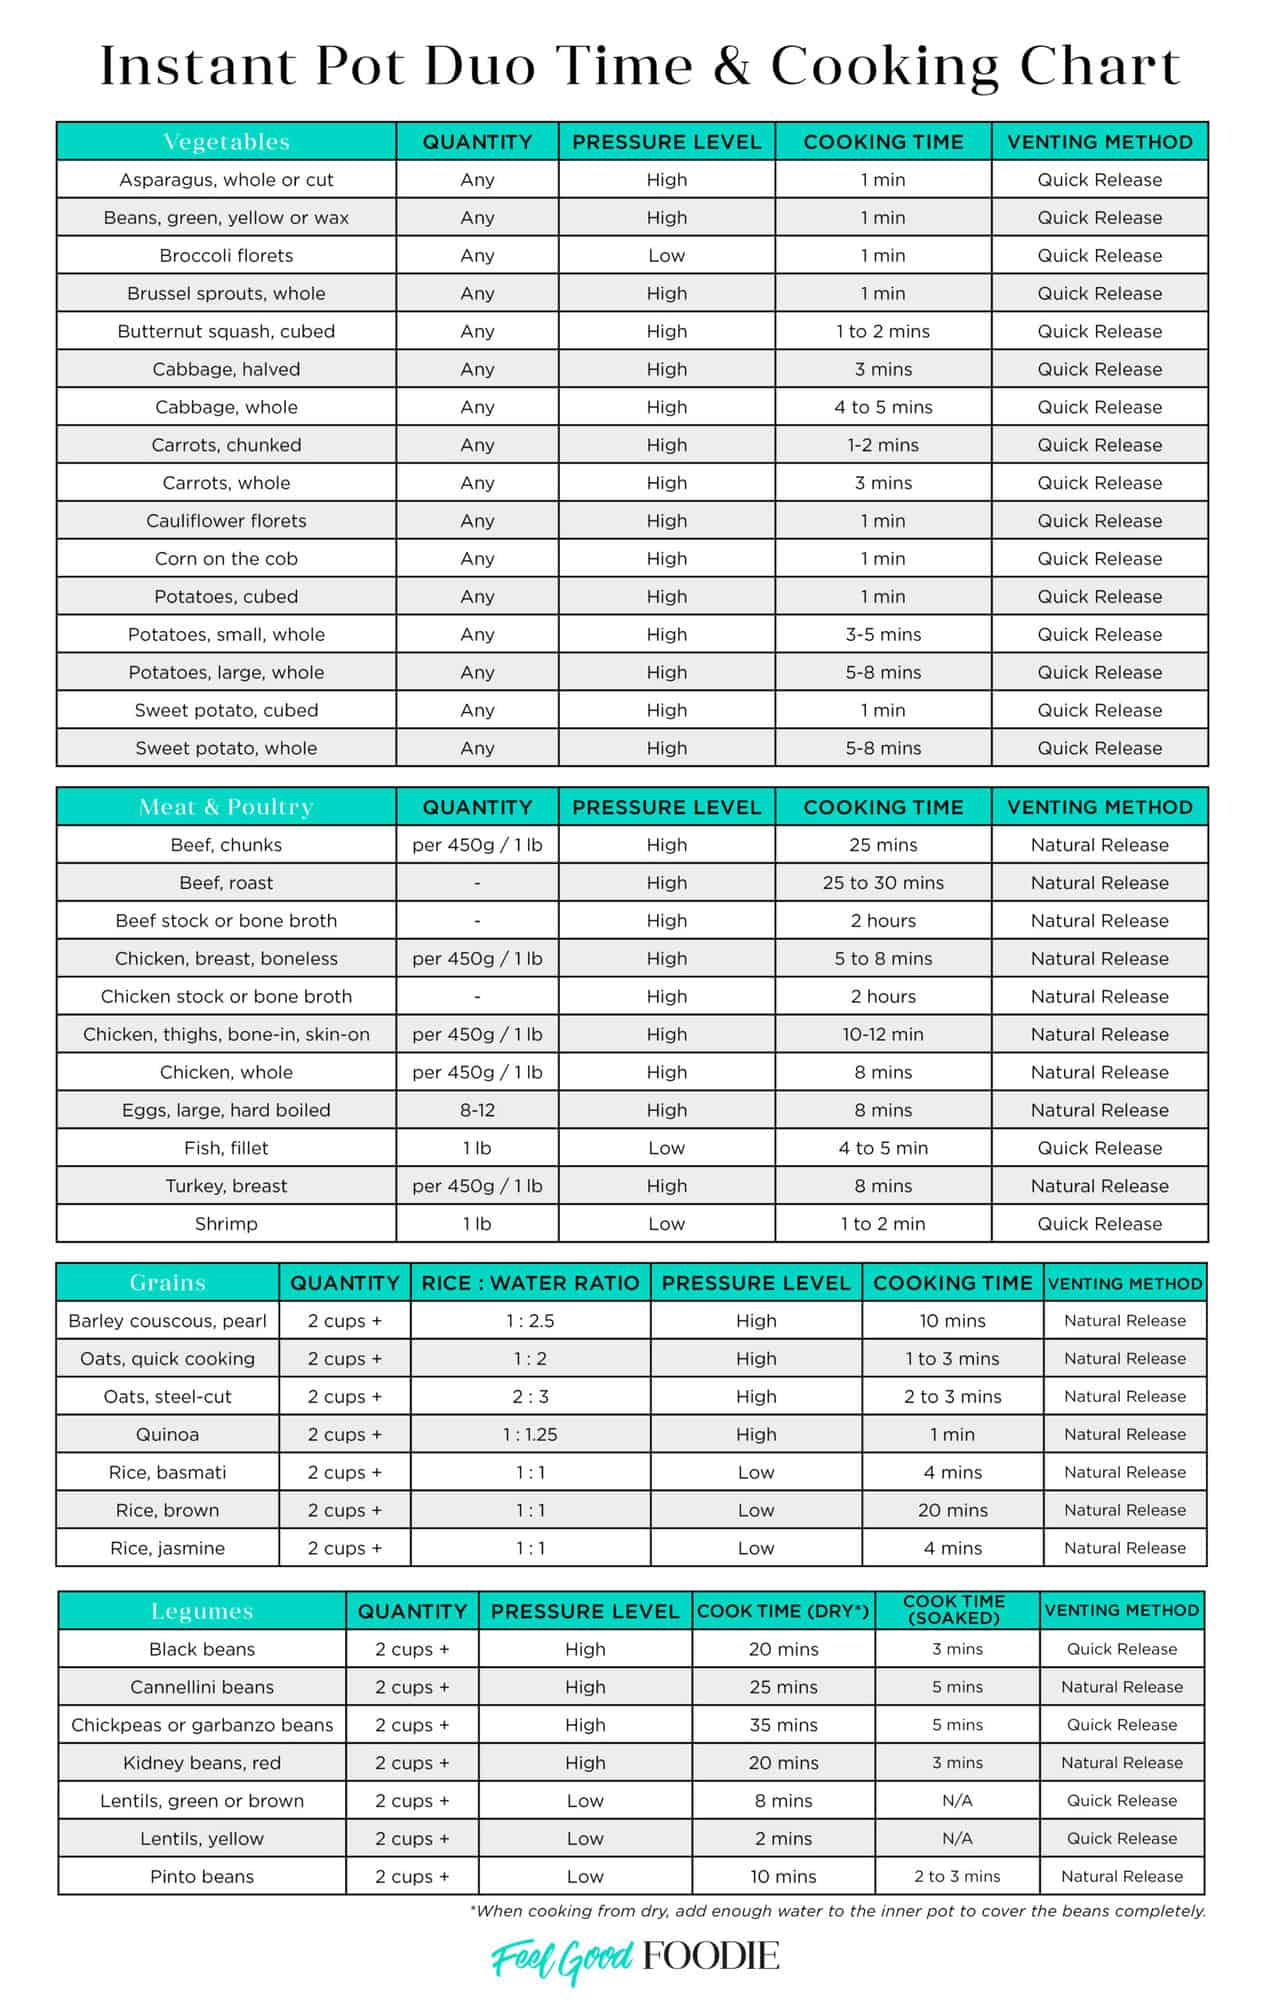
Instant Pot Cooking Times
Below are some cook times for favorite ingredients that appear on Feel Good Foodie. Find more information in your instruction manual and time tables on InstantBrands.com.
Instant Pot Safety Tips
The Instant Pot is one of the safest kitchen appliances you’ll ever own, but there are a few precautions to keep in mind to avoid accidents and unwelcome splatters. This section is especially helpful if you’re looking to learn how to use an Instant Pot for the first time. I’ll go over the general safety tips plus common troubleshooting issues.
Common Safety Precautions
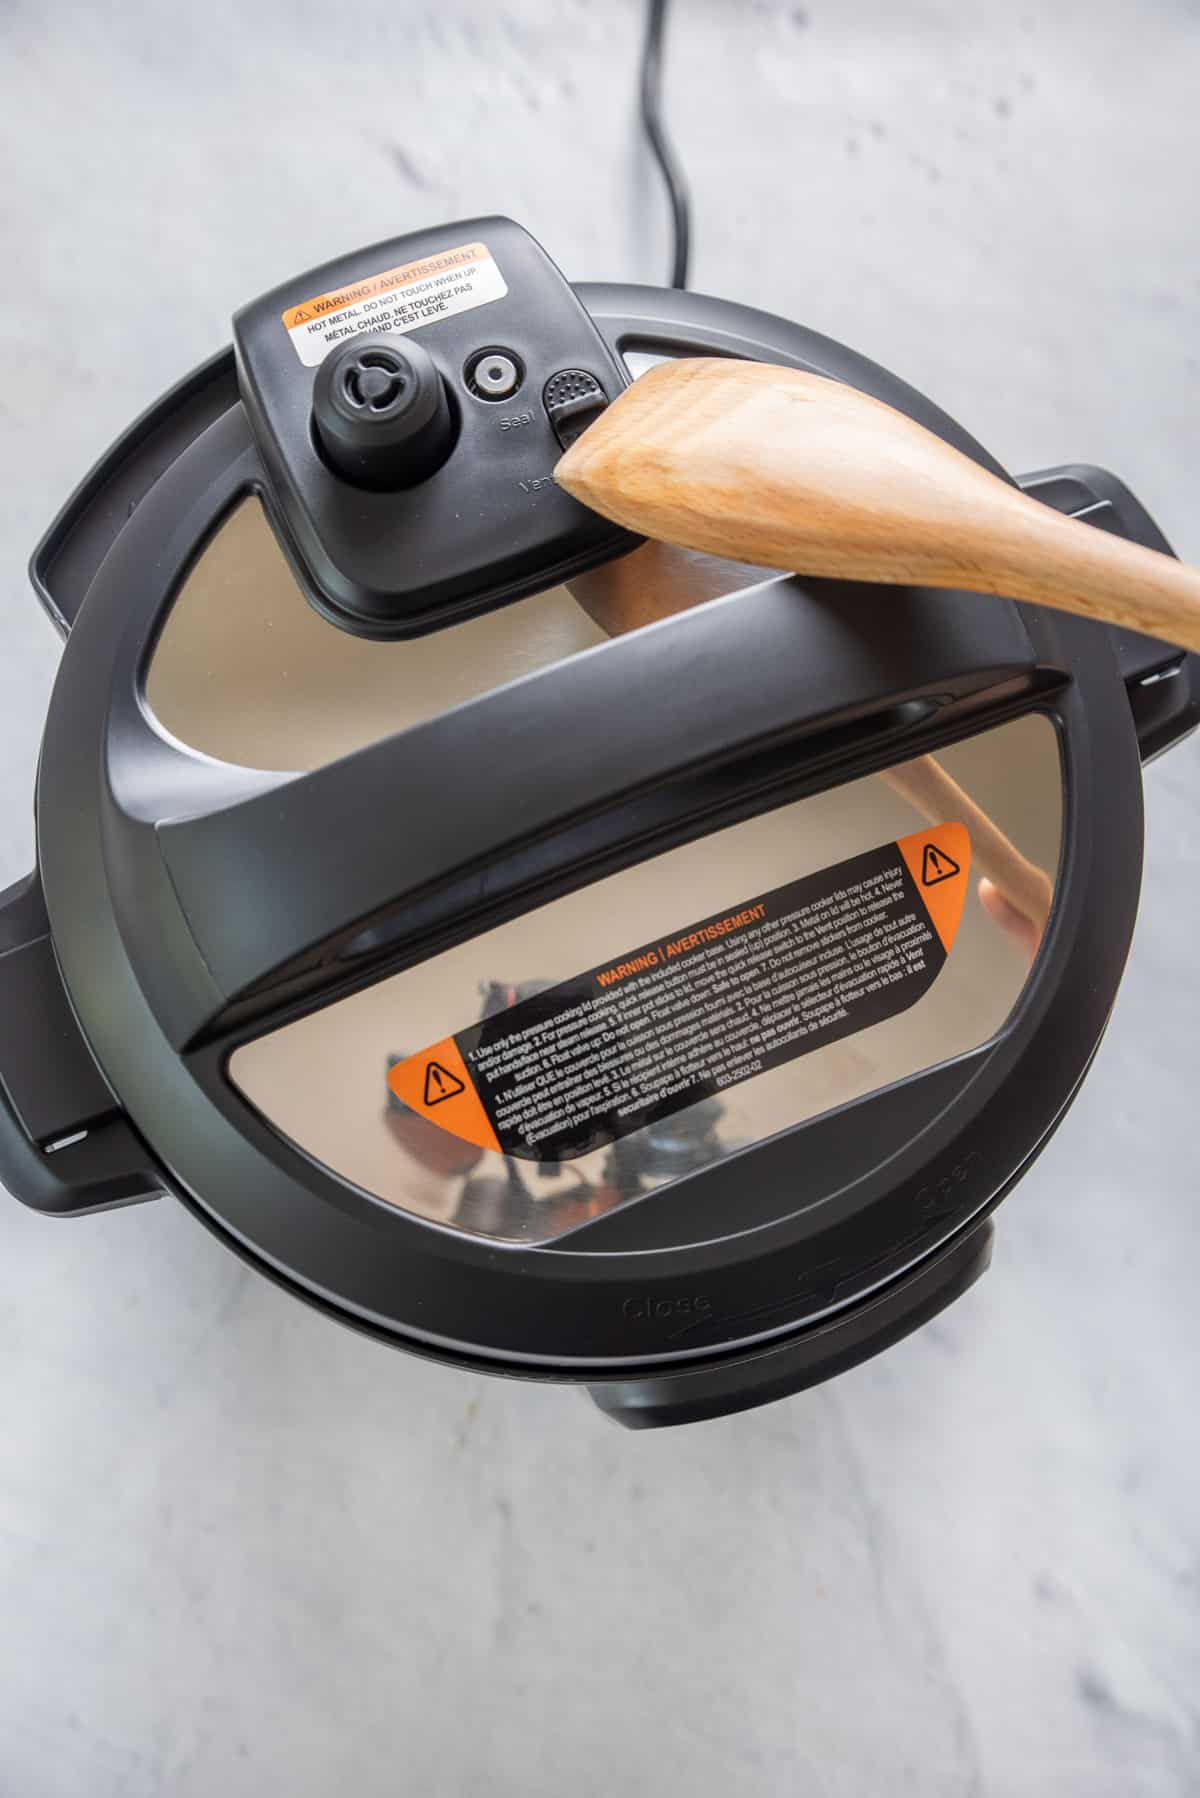
Read the safety precautions in the Users Manual and do the initial water test when using it for the first time. Watch your liquid levels. The liquid is necessary to create steam for pressure cooking. Always add the recommended amount of at least ½ cup of liquid. Other recipes, like rice or beans, will require more, so it’s important to follow the recipe. Mind the maximum fill lines marked on the side of the inner pot. The lower one is for foods that expand, like rice, grains, and vegetables, and includes the liquid. The upper line is for everything else. Filling above these lines may cause your Instant Pot to malfunction and shut off. Inspect the silicone sealing ring for any rips, tears, or cracks, and make sure it’s firmly set in the track of the lid. Check to make sure the steam release valve/handle is turned toward the back to Sealing position. On newer IP models, this happens automatically when you lock the lid. Watch the released steam. Use the handle of a wooden spoon or an oven mitt to avoid being burned by the released steam when doing the quick-release pressure. Never attempt to open the lid when the float valve is in the upper position. That means it’s pressurized and could result in the dangerous release of steam or hot food. Always wait for the float valve to drop completely before opening the lid. Press CANCEL to stop immediately and carefully unplug from the outlet, if necessary.
Troubleshooting Common Issues
If you’re wondering how to use an Instant Pot for the first time, it’s common to have basic troubleshooting questions. As always, you can consult your Users Manual for specifics about your Instant Pot model, but I hope this section offers some basic solutions so you can carry on with all your delicious dishes.
Instant Pot won’t seal. This may be due to the silicone sealing ring not being properly set or the lid not being aligned correctly.Solution: Make sure the sealing ring is currently fitted into the track of the lid and not twisted in any part. When closing the lid, ensure the arrows line up with the base and are locked into place. Steam escaping from sides of the lid. Often as a result of the sealing ring not being properly installed or the lid not being aligned correctly. This common issue is the most inconvenient because it makes a mess as all the food splatters around the Instant Pot. But, it has a very simple solution. Solution: Check the sealing ring to make sure it’s set firmly in the track of the lid and make sure the lid is aligned correctly and locked into place. Float valve won’t rise. This means the Instant Pot cannot build up enough pressure and will eventually halt the cooking process. This could be because there’s not enough liquid, the float valve is dirty, or the steam release valve is set to Venting position instead of Sealing position. Solution: Ensure there’s enough liquid in the pot for the pressure to build, and make sure the steam release valve is set to Sealing position. Lastly, check to see that the float valve and the area around the valve is clean and free of any food. Burn warning on the display screen. This is common when the food is stuck to the bottom of the inner pot, or there isn’t enough liquid, triggering the overheating protection.Solution: Add more liquid to the recipe to prevent burning, and stir the ingredients to ensure nothing is stuck to the bottom before starting the pressure cooking cycle. You may also need to deglaze the bottom of the pot by adding liquid and scraping up any food bits stuck to the bottom with a flat spatula. Instant Pot not coming to pressure. This issue can be frustrating because it can have various causes. First, you have to make sure that your Instant Pot is truly failing to reach pressure rather than just taking too long to pressurize. If there’s a large amount of food or liquid in the pot, or if the food is cold or frozen, it will take much longer for the Instant Pot to reach pressure. In that case, be patient as all those things require more time during the preheating stage.Solution: If it’s truly not coming to pressure, try these troubleshooting techniques: 1) check to make sure there is enough liquid in the pot2) ensure the lid and sealing ring are dry and free from any food debris3) make sure the steam release valve is set to Sealing position4) check the float valve to make sure it’s clean5) If you overfill the Instant Pot, remove some food to allow enough room for pressure to build. Food came out too “soupy” or thin. This can happen if there is too much liquid or if you start with frozen food like vegetables or meats. Solution: Remove the Instant Pot lid and use the Sauté function to let the dish cook down. Stir regularly to avoid the food getting stuck on the bottom.
Cleaning and Maintaining Your Instant Pot
Keeping your Instant Pot clean will not only prolong its lifespan but make cooking more enjoyable. And the good thing is it’s super easy to do with a few daily habits and a deep clean every now and then.
Daily Cleaning Tips
Deep Cleaning and Maintenance
Deep clean the lid. Remove all the parts of the lid: silicone sealing ring, anti-block shield (the small round cover under the lid), steam release valve (just pull it up), and float valve by popping off the silicone plug on the bottom of the valve. Be careful not to lose any of these parts. Clean them thoroughly in warm, soapy water and then dry completely. I prefer to keep the silicone ring separate from the lid so it can air out well. Sanitize the sealing ring. Over time, the silicone sealing ring can have an odor from all the different foods. You may also notice the color change from clear to more tannish brown. Even though this doesn’t affect the food, it can look unappealing. Tip: keep an extra set of rings for different foods (savory, pungent, sweet). You can do a quick vinegar steam clean to sanitize the sealing ring by following these steps:1) Fill the inner pot with 2 cups of white vinegar (or the same amount of water and lemon rind). 2) Close the lid, set it to the Sealing position, and run it on a Steam cycle for 2 minutes.3) Remove the ring from the lid and let it air dry thoroughly. It should smell fresh and clean. Wash the condensation collector. Some models have a condensation collector on the back of the base unit, and it does just that: it collects condensation. Pop it out and wash it out well. Dry it completely before attaching it back to the unit. Clean the stainless steel pot. If you want your inner pot to be squeaky, clean, and shiny like new, use a scratch-free cleaning powder cleanser like Bon Ami or Bar Keepers Friend. Just sprinkle some on the bottom of the pot and scrub gently with a damp sponge, emphasizing the stained areas. Then wash it out with hot, soapy water. Wipe down the Instant Pot. Use a damp rag to wipe down the outside of the Instant Pot. Take care not to let any moisture get into the heating element inside or electrical components. Clean the inside of the rim or lip where the lid rests. Sometimes, crumbs and food get caught in the lip and may cause the lid to not seal during cooking. Use a small brush like a toothbrush, q-tip, or a piece of wadded-up paper towel and run it through the entire rim to ensure it’s clean and dry. Reassemble and store. Make sure all components are thoroughly dry before reassembling. I recommend storing the sealing ring separately to allow air circulation and prevent food odors in the ring. Attach the steam release valve, float valve, and anti-block shield to the lid and condensation collector back on the base unit. Store the lid upside down on the base unit or slightly ajar to allow air circulation. Wrap up the cord and tuck it inside the pot to keep it secure and prevent it from hanging loose. Helpful tips to prolong Instant Pot lifespan: Store in a cool, dry place away from direct sunlight to prevent breaking down the silicone parts and keep your Instant Pot in good working condition. Replace the sealing ring regularly. They are inexpensive and should be replaced yearly, depending on use. If your silicone ring shows signs of wear and tear or retains strong odors, replace it. Avoid harsh cleaners. Use non-abrasive cleaners to prevent scratching the pot. Perform deep cleaning regularly. It’s a good idea to do a deep clean every 3-4 months, depending on use, or after cooking very strong-smelling or straining foods (i.e. curry) to keep your Instant Pot in optimal condition.
Additional Recipes to Make in an Instant Pot
Instant Pot Shredded Chicken Instant Pot Spaghetti Squash Instant Pot Steel Cut Oats Instant Pot Mashed Potatoes Instant Pot Chickpeas Instant Pot Chicken Stock Instant Pot Broccoli Soup
Cooking From Frozen
One fantastic Instant Pot timesaver is its ability to cook proteins from frozen in about 30 minutes. It takes only 2 minutes longer than regular cooking, but you skip the 24-hour fridge defrost! Watch the video below to learn more about the methods for cooking chicken, ground beef, and fish from frozen. Now that you’ve learned all there is to learn about how to use an Instant Pot for the first time, are you ready to jump in? I hope this Instant Pot guide inspired you and gave you the confidence to cook up a storm with this trusted kitchen appliance.
More Cooking Guidelines to Check Out
How to Organize Your Fridge How to Cut an Avocado How to Cut an Onion How to Stock a Freezer How to Grill Tips for Making Meal Time Delicious
If you find this guide for How to Use an Instant Pot for Beginners helpful, we’d love to hear from you! You can grab an Instant Pot Duo for yourself by clicking here! And if you snapped some shots of any of these tips and tricks, please share them on Instagram so we can repost on the Feel Good Foodie stories!